If I've made a mistake somewhere, or haven't covered something that you think should be covered, please mail me about it.
Contributors:
What follows is a set of notes and examples, in no particular order, on how to do various things, some simple, some a little bit twisted, with TEX and LATEX.
If I've made a mistake somewhere, or haven't covered something that you think should be covered, please mail me about it.
Contributors:
Recommended reading: The (Not So) Short Introduction to LATEX 2e - many systems will have it in texmf/doc/latex/general/lshort.dvi.
\documentclass[a4paper]{article}
\begin{document}

% write stuff here

\end{document}
\def\add#1#2{
 \newcount\tmp
 \tmp=#1
 \advance\tmp by #2
 \number\tmp
}
\add{1}{2} produces 3. As well as \advance,
you can use \divide and \multiply, but be
aware that these are all integer operations.
\input part1
TEX will guess the .tex suffix, so the above is equivalent to:
\input part1.tex
The \input command inserts the contents of the specified file
at the current location. It can be used to split a large .tex
file into more manageable chunks.
Line
\\[6pt]
Another line
The size of the gap can be given in any units. It can also be negative.
Before \begin{document}, add something like:
\usepackage[nohead,margin=2cm,includefoot]{geometry}
The geometry package can be used to manipulate margins in many interesting ways. Be sure to read the documentation that comes with it. Also, make sure you have a sufficiently recent version of the package - you can download the latest one from CTAN and keep the geometry.cfg and geometry.sty files in the same directory as your .tex source.
There is also the slightly more standard fullpage package that will set 1-inch margins:
\usepackage{fullpage}
Or 1.5cm margins:
\usepackage[cm]{fullpage}
To produce a table like:
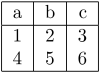
Use something like the following:
\begin{tabular}{|l|c|r|}
 \hline
 a & b & c\\
 \hline
 1 & 2 & 3\\
 4 & 5 & 6\\
 \hline
\end{tabular}
Left, centered, and right column alignments are specified as
l,
c, and
r, respectively.
The bars (|) between column alignment
letters become vertical borders in the table. Horizontal borders are
created using \hline.
Cells are separated with ampersands (&) and rows are
terminated using the line break (\\).
Before \begin{document}, add
\usepackage{graphicx}.
Then you can insert a figure using:
\begin{figure}[h]
 \includegraphics{figure.eps}
\end{figure}
h stands for "place the figure here." The other
possible placements are t and b for
top and bottom, respectively.
To scale the figure:
\begin{figure}[h]
 \includegraphics[scale=0.5]{figure.eps}
\end{figure}
To center the figure:
\begin{figure}[h]
 \centering
 \includegraphics{figure.eps}
\end{figure}
To add a caption:
\begin{figure}[h]
 \includegraphics{figure.eps}
 \caption{Representation of stuff}
\end{figure}
To put a border around the figure:
\begin{figure}[h]
 \fbox{ \includegraphics{figure.eps} }
\end{figure}
To be able to reference the figure in text afterwards:
\begin{figure}[h]
 \includegraphics{figure.eps}
 \caption{Representation of stuff}
 \label{fig:stuff}
\end{figure}

Please refer to figure \ref{fig:stuff}.
Note that you must have a \caption. You will also have to
process the document twice to generate correct references.
\textbf{bold}
\textit{italic}
\underline{underlined}
\texttt{typewriter, monospace}
\textsf{sans serif}
\textsc{small caps}
Text is justified by default. To force left alignment:
\begin{flushleft}
 Text goes here.
\end{flushleft}
Text sizes, from smallest to largest:
{\tiny         text}
{\scriptsize   text}
{\footnotesize text}
{\small        text}
{\normalsize   text}
{\large        text}
{\Large        text}
{\LARGE        text}
{\huge         text}
{\Huge         text}
In LATEX:
\newpage
In plain TEX:
\eject
You may wish to use \vfil immediately before
\eject or TEX will try to stretch the contents vertically
to fill the whole page.
After specifying the \documentclass:
\usepackage{multicol}
\setlength{\columnsep}{1.5pc}  % space between cols
\setlength\columnseprule{.4pt} % line between cols
Then, in the body of the document:
\begin{multicols}{2}
 Stuff
\columnbreak
 More stuff.
\end{multicols}
Make a file, for example duplex.pro that holds the following line of PostScript:
<< /Duplex true >> setpagedevice
Then, process your DVI into PS using:
dvips -h duplex.pro -o out.ps in.dvi
To suppress all page numbers in the entire document:
\usepackage{nopageno}
Alternately, page numbers can be suppressed on a page-by-page basis by using:
\thispagestyle{empty}
For plain TEX, use:
\nopagenumbers
To produce a formula like:

Use something like the following:
\begin{displaymath}
 \textrm{sinc}(x) = \left\{
 \begin{array}{ll}
  1                & \textrm{for } x=0 \\
  \frac{\sin x}{x} & \textrm{else}
 \end{array}
 \right.
\end{displaymath}
To suppress the number before a section title, use:
\section*{No number due to asterisk}
A paragraph indent can be suppressed by prefixing it with
\noindent. To use vertical spacing instead of paragraph
indents across the entire document, add the following before
\begin{document}:
\setlength{\parindent}{0pt}
\setlength{\parskip}{\baselineskip}
Or, use the parskip package:
\usepackage{parskip}
\usepackage{lscape}, then use
\begin{landscape}...\end{landscape} for parts of the
document that are desired in landscape.
To get a pretty binomial coefficient like:

Use: n \choose r in math mode.
To set the font size using LATEX2e:
Here is some text in a
{\fontsize{14pt}{16pt}\selectfont different size}.
The first parameter (14pt) specifies the font size, the second parameter sets the baseline skip.
When using the Computer Modern typeface, calls to
\fontsize will round the specified size to one of a number
of presets. For example:
{\fontsize{60pt}{60pt}\selectfont BIG}
Results in:
LaTeX Font Warning: Font shape `OT1/cmr/m/n' in size <60> not available, size <24.88> substituted.
To get text at any arbitrary size, use a Type 1 font. For example, Adobe Times (the ptm family):
{\fontfamily{ptm}\fontsize{60pt}{60pt}\selectfont BIG}
\vspace*{\fill}
...contents...
\vspace*{\fill}
In the itemize environment, the spacing between items and
paragraphs is determined by the lengths \itemsep and
\parskip. Unfortunately, these lengths are reset upon
entering the itemize environment, so setting them outside
of the environment has no effect, and the solution becomes a little bit
hacky.
Hijack the \begin macro, so that
\begin{itemize} will enter the itemize environment, then
set \itemsep and \parskip to the desired
values:
\makeatletter
\let\origbegin=\begin
\def\begin#1{
\origbegin{#1}
\def\@a{#1}
\def\@b{itemize}
\ifx\@a\@b
\addtolength{\itemsep}{.5cm}
\addtolength{\parskip}{.5cm}
\fi
}
\makeatother
Thanks to Iman S. H. Suyoto for suggesting the use of @.
Color is represented using a DVI special. When using LATEX, there is a color package that makes this painless:
\usepackage{color}
...
% "some colored text"
some \textcolor{red}{colored} text
In plain TEX:
some \special{color push rgb 1 0 0}colored\special{color pop} text
You can specify color as:
color push rgb (r) (g) (b)
color push cmyk (c) (m) (y) (k)
color push gray (g)
or by name, e.g.
color push Black
If specifying by value, the values are floats between 0 and 1.
TEX works by arranging boxes and glue. Each character is a box. Character boxes are merged into words. Word boxes, and inter-word spacing (which is glue), is merged into lines. Each line is a box. Finally, a page is a box containing lines, diagrams, and other such boxes.
Here is \hbox{hg} with the box and baseline drawn in:
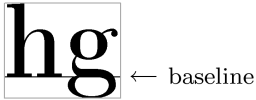
The baseline is the line that all characters "sit" on. A line on the page will have all elements lined up so that they sit on the same baseline.
The height of a box is a measure of how far it extends above the baseline.
Some characters dip below the baseline. The extent of this is called the depth of the box.
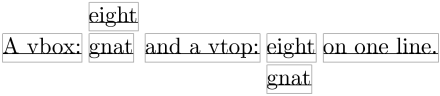
A \vbox is a box that has contents in vertical mode.
\vbox{hello} would produce a box as wide as the page, containing
the word "hello"
To limit the width to the minimum needed for the contents, we would wrap the
contents in an \hbox. i.e.: \vbox{\hbox{hello}}
A \vbox could contain multiple "lines" and still be used as an
element in horizontal mode. Remember that TEX arranges all elements on the
same baseline. The baseline of a \vbox is the baseline of its
bottom element.
A \vtop is the same as a \vbox except its baseline
is the baseline of the topmost element.
Example:
\def\vhb#1{\vbox{\hbox{#1}}}

A vbox:
\vbox{\vhb{eight}\vhb{gnat}}
and a vtop:
\vtop{\vhb{eight}\vhb{gnat}}
on one line.
With visible boxes and baselines: